Deploying a custom application
The Napptive Playground supports the deployment of any OAM application. The process of migrating an application can be summarized in the following steps:
- What is OAM application
- Preparing your application
- Creating the OAM files
- Deploying the application
- (Optional) Uploading your application to the catalog
- (Optional) Attaching persistent storage
- (Optional) Accessing web applications
What is an OAM application
The Open Application Model specification aims to simplify how we express complex cloud native applications in a portable and extensible way, and it is the focus of the Playground development platform. To deploy an application, you will need to create a YAML file defining the Application and its components. Components can be extended by means of adding traits to alter their characteristics, add functionality, etc. The following snippet contains a basic OAM application.
apiVersion: core.oam.dev/v1beta1
kind: Application
metadata:
  # Name of the application which will be used to refer to it once deployed.
  name: <name>
spec:
  # List of components that are part of the application.
  components:
      # Each component must have a name. The name will be used during the translation process
      # to Kubernetes entities.
    - name: <component name>
      # Each component is associated with a type. The type works as a template and defines
      # how a high-level component will be translated into Kubernetes.
      type: <component type>
      # Properties that can be configured for the user. This can be use to set the parameters
      # that are defined by the component type.
      properties:
        <parameter values>
      # Traits are extensions that augment the capabilities of a component. For example,
      # changing the replication, importing a config map, etc.
      traits:
        - type: <trait type>
          properties:
            <traits parameter values>
For more information, check our documentation about Applications.
Preparing your application
To deploy an application in the Napptive Playground, you would need:
- A list of container images that will be used to spawn the application. If you have a custom Dockerfile, just create the image and upload it to a registry of your choice.
- Documentation on the container parametrization. This usually involves navigating the target application documentation to identify open ports, environment variables, etc.
Creating the OAM files
Next, we will need to create the required OAM files. For this example, we will use MongoDB as the target application to showcase the migration steps.
First, locate the official container images, and check how the container is executed from the associated documentation.
$ docker run --name some-mongo -d mongo:tag
As this application will only have a single component, take the skeleton presented in the previous step and copy it into a file named mongo.app.yaml. Update the application name, version, and description. And next create a single component that uses the image defined in the previous run command. In this case, instead of using latest we have taken a named version from the mongodb tags named jammy.
apiVersion: core.oam.dev/v1beta1
kind: Application
metadata:
  name: mongodb
  annotations:
    # In this case, the application version will match the component one.
    version: "jammy"
    description: "MongoDB database"
spec:
  components:
    - name: mongodb
      type: webservice
      properties:
        image: mongo:latest
The previous application definition can be launched in the playground, but has two major flaws. First, there is no definition about incoming ports, so other applications in your environment will not be able to connect to it, and second there is no storage associated with it, so in case of the component being rebooted, the data will be lost.
Moreover, we should setup the initial user and password to access the database. If we take a look to the docker compose file shown in the registry doc, we find both the default port (27017), and the required environment variables:
# Other content omitted for clarity
services:
  mongo:
    image: mongo
    restart: always
    environment:
      MONGO_INITDB_ROOT_USERNAME: root
      MONGO_INITDB_ROOT_PASSWORD: example
To set the port and those variables in the OAM application, update the mongo.app.yaml file with the following content:
apiVersion: core.oam.dev/v1beta1
kind: Application
metadata:
  name: mongodb
  annotations:
    # In this case, the application version will match the component one.
    version: "jammy"
    description: "MongoDB database"
spec:
  components:
    - name: mongodb
      type: webservice
      properties:
        image: mongo:latest
        ports:
          - port: 27017
            expose: true
        env:
          - name: MONGO_INITDB_ROOT_USERNAME
            value: "root"
          - name: MONGO_INITDB_ROOT_PASSWORD
            value: "example"
This application uses the webservice component type as it is the most common one. Check other component types and available traits to get advantage of all the possibility of the Open Application Model.
Deploying the application
The application can now be launched in the Playground by clicking on the  button and selecting “YAML Deploy”. A screen will be shown where you can directly enter the previous YAML content.
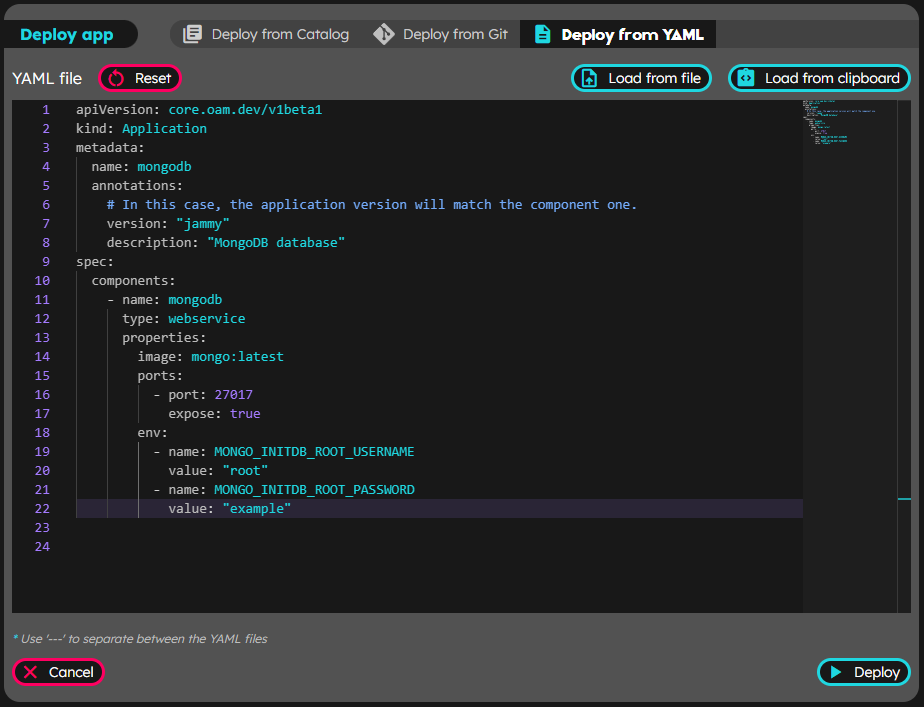
Click on deploy, and once the application is deployed, check the logs to confirm that is running and awaiting incoming requests. This application will accept incoming connections to mongodb:27017 from other applications and components deployed on the same environment.
Uploading your application to the catalog
As an optional step, you can upload the application to the catalog facilitating the deployment of the application without using the raw YAML files. Depending on the visibility you can upload applications to the catalog so that your account is the one with access to them, or in public mode so other users of the playground can deploy your applications.
To upload an application to the catalog, you will need to prepare at least three files:
- The raw YAML files that define the application. In this example, the
mongo.app.yamlfile you created in the previous steps. - A README.md file with the content that will be shown when navigating the catalog to describe what the application does and how to use it. A detailed README will help other team members to use the application.
- A metadata file that defines what the application is so that it can be searched in the catalog.
To upload this application to the catalog, create two new files mongo.metadata.yaml and README.md with the following content.
mongo.metadata.yaml
apiVersion: core.napptive.com/v1alpha1
kind: ApplicationMetadata
name: "MongoDB"
version: "jammy"
description: MongoDB database
keywords:
  - "mongodb"
  - "database"
license: "SSPLv1"
url: "https://www.mongodb.com"
doc: "https://hub.docker.com/_/mongo"
logo:
  # Do not hotlink images without permission :)
  - src: "https://storage.googleapis.com/artifacts.playground.napptive.dev/logos/mongodb.svg"
    type: "image/png"
    size: "120x120"
README.md
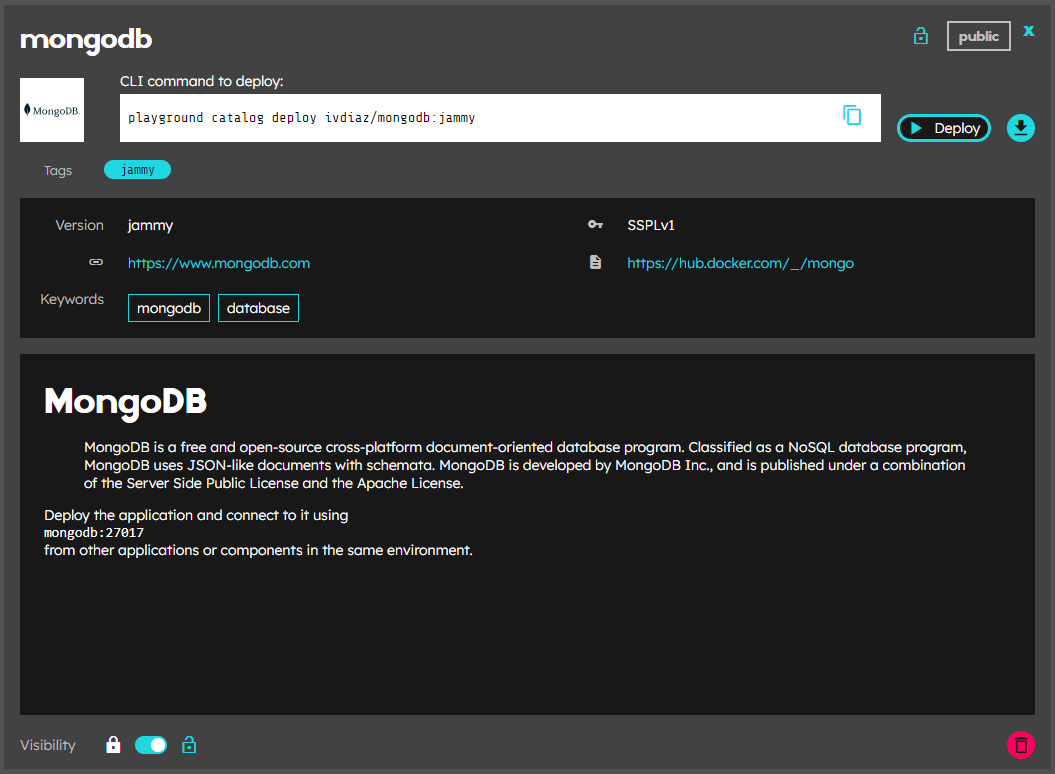
# MongoDB

> MongoDB is a free and open-source cross-platform document-oriented database program. Classified as a NoSQL database program, MongoDB uses JSON-like documents with schemata. MongoDB is developed by MongoDB Inc., and is published under a combination of the Server Side Public License and the Apache License.

Deploy the application and connect to it using `mongodb:27017` from other applications or components in the same environment.
Next, click on the upper left hand corner ![]() icon to open the catalog window. Afterwards, click on
icon to open the catalog window. Afterwards, click on  and you will be presented with a new window to set the application name and version. Make sure that you set the visibility of the application. Public applications in the catalog are accesible by other users of the platform while private ones are only accessible by users in your account.
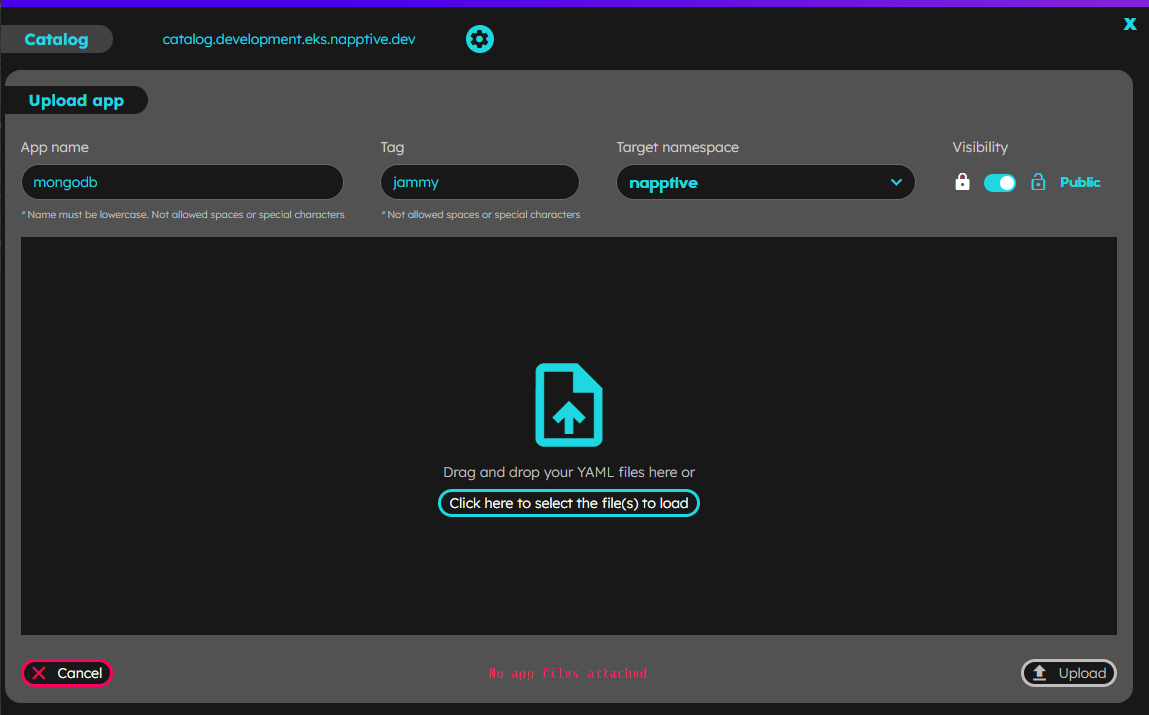
Next, select the files that are part of the application, and click 
Once the application is uploaded it is ready to be used from the catalog.
Attaching persistent storage
Some applications may require persistent storage. Notice that depending on your account plan, persistent storage may not be accessible. To add a persistent volume to the mongodb application, check where the application is going to store data on container or application documentation which corresponds to:
$ docker run --name some-mongo -v /my/own/datadir:/data/db -d mongo
To translate this into an OAM application, use the storage trait to update the mongo.app.yaml file you created before.
apiVersion: core.oam.dev/v1beta1
kind: Application
metadata:
  name: mongodb
  annotations:
    # In this case, the application version will match the component one.
    version: "jammy"
    description: "MongoDB database with persistent storage"
spec:
  components:
    - name: mongodb
      type: webservice
      properties:
        image: mongo:latest
        ports:
          - port: 27017
            expose: true
        env:
          - name: MONGO_INITDB_ROOT_USERNAME
            value: "root"
          - name: MONGO_INITDB_ROOT_PASSWORD
            value: "example"
      traits:
        - type: storage
          properties:
            pvc:
              - name: data
                accessModes:
                - ReadWriteOnce
                # Mount path matches the one set in the docker run command
                mountPath: /data/db
                resources:
                  requests:
                    storage: 1G
Accessing web applications
The Playground offers a simple ingress trait that allows you to create an HTTPS endpoint automatically to access a web application. While this does not apply to the previous MongoDB example, if you have a component that exposes a web endpoint on port 1234, you can easily expose that to the Internet by adding the following trait:
# Other content omitted for clarity
components:
  - name: myweb
    type: webservice
    properties:
      image: mongo:latest
      ports:
        - port: 1234
          expose: true
    traits:
      - type: napptive-ingress # a napptive-ingress trait to get a public endpoint
        properties:
          port: 1234
          path: /
Once your application is deployed, you will see an endpoint section with a public link to access it.
What’s next
- Something did not work out/behave as expected? Contact support or contact us via the Community Slack so we can help you.
- Learn how to work with environments.
- Learn more about the Catalog